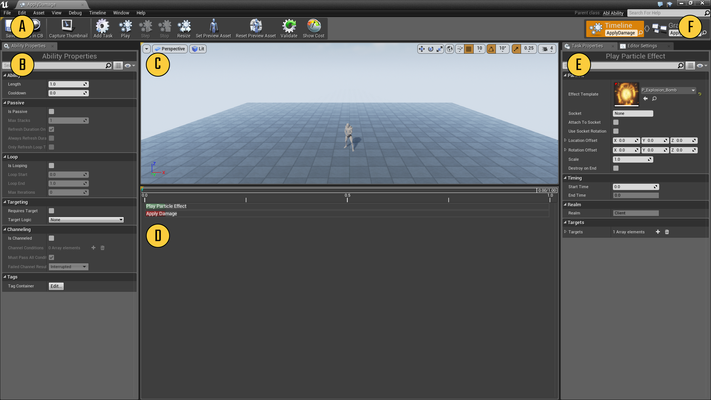
The Ability Editor is a custom editor that allows for the quick creation and iteration of Abilities. The Editor itself has two main modes: Timeline Mode, and Graph Mode.
On this page we'll dive into each.


Sections
- A. Ability Editor Toolbar
- B. Ability Properties Panel
- C. Preview Viewport
- D. Task Timeline
- E. Task Properties Panel
- F. Mode Switch Panel
Now let's dig into each section and learn a bit about each.
Ability Editor Toolbar

The Ability Editor Toolbar is just like normal Toolbars you find throughout the Unreal Editor with a few special commands attached to help you.
Save
Saves the Ability Asset.
Find in CB
Finds the current Ability asset in the Content Browser.
Capture Thumbnail
Captures the current Viewport image and uses it as the thumbnail for the Ability.
Add Task
Brings up the Add Task dialogue where you can select which type of Task you wish to add to your Ability.
Play / Pause
Plays the Ability in its current state using the Preview Actor in the Preview Viewport. When playing the Ability, this becomes a Pause icon which can be used to pause playing the current Ability.
Step
When an Ability is paused, using the Step button will cause the Ability to move forward one frame (you can setup the frame rate, 15FPS/30FPS/60FPS, in the Ability Editor options).
Stop
When an Ability is playing or paused, you can use this button to terminate the Ability immediately (some actions may still play through - Animations or Particles for example).
Resize
This will resize the Ability's length to the shortest value needed to play all the current tasks. This ensures there is no "empty space" at the end of your Ability, it comes in very handy while building up Tasks.
Set Preview Asset
Brings up the Preview Asset Selection dialogue which allows you to pick an asset to use as the Preview Actor in the Preview Viewport. Currently the system supports Static Meshes, Skeletal Meshes, and Animation Blueprints.
Reset Preview Asset
Respawns the Preview Actor into a fresh state.
Validate
See Ability Validator.
Show Cost
A common issue with non-technical users is they have no real concept of what makes a system or asset expensive in terms of computation, bandwidth, etc. This can lead to those users either playing too safe and over thinking things, or being too aggressive and making content that grinds performance to a halt. When Show Cost is enabled, it will change a Tasks' color from its normal hue to a value between Green (Cheap, can be used multiple times easily) to Red (Expensive, should be used sparingly). The value for each task is determined at run-time based on various parameters (is the task able to run asynchronously? Does it do any Blueprint work? Does it require an query on the world? Is that query asynchronous? etc). In the end, Show Cost is just a hint and you should always cost with your engineers if you have a question or concern about an Ability you are crafting.
Ability Properties Panel

The Ability Properties Panel simply shows and allows the user to edit the properties for the Ability as a whole including properties like Length, Looping, etc. For more detail, please see Ability Overview.
Preview Viewport

The Preview Viewport is a real-time preview world with a single Actor (Preview Actor) that you can modify and ultimately use to see how your Ability looks/sounds. There (currently) isn't any special functionality to this viewport, so if you have any questions please check the official Unreal Editor documentation on Editor Viewports.
Task Timeline

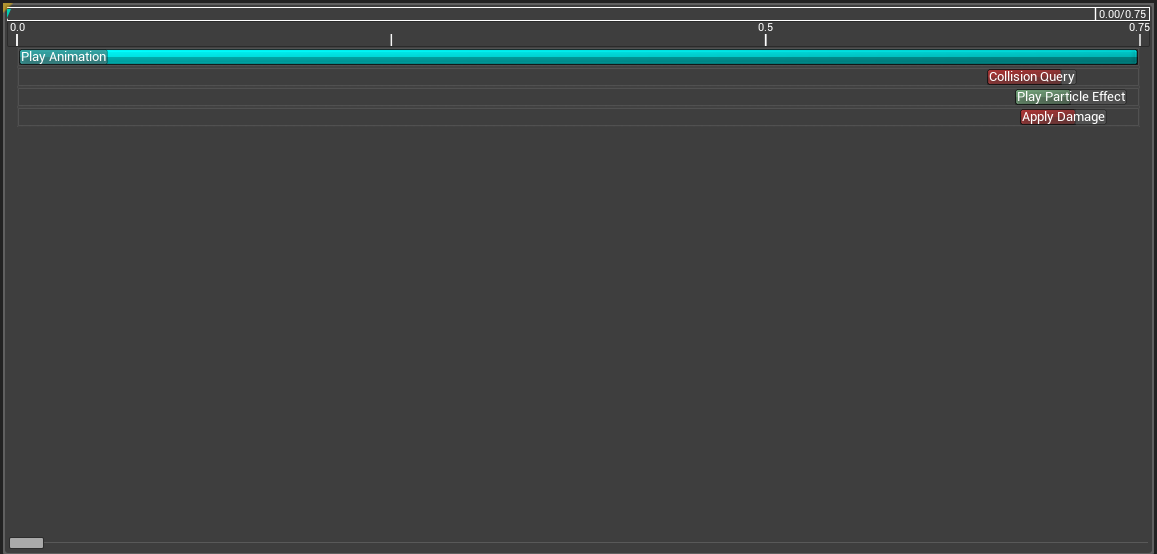
The Task Timeline is a visual representation of the length of an Ability and what happens during that time. In the example above, you can see our Ability lasts 0.75 seconds and there are 4 Tasks that occur during that time: Play Animation, Collision Query, a Particle Effect, and finally an Apply Damage Task.
The length of the Task determines how long it executes for. You can see the Play Animation task goes on for the duration of the Ability, but the other 3 happen rather quickly and don't continue on afterwards. Certain tasks allow for a "Single Frame" option and despite showing a larger time value on the Timeline (a single frame duration would be ~33ms for 30FPS and ~16ms for 60FPS which is too small to display properly on the Timeline), that is just for the User's convenience - if a Task is marked as Single Frame, it is Single Frame.
Most Tasks support dynamic sizing in the editor, so you can resize/move your Task using simply your mouse by grabbing the edges or center of a Task.
Tasks are automatically sorted according to their Start time when an Ability is saved. So if you re-order your Ability Tasks and then re-open the asset - the Tasks will be re-arranged. This is by Design and completely expected. |
Task Properties Panel

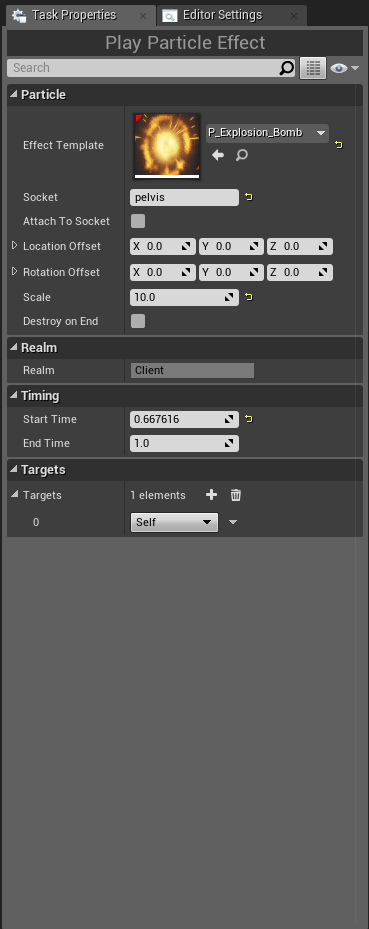
This Panel is where you can edit all the various properties of which ever Task you have currently selected. In this example the current Task is a "Play Particle Effect" Task and all the properties for that Task are shown, along with some basic Task properties like Start Time, and Task Targets. For more information, see Tasks.
Mode Switch Panel

This Panel is where you can see what Editor Mode you are currently in (along with the changes in the Editor, etc), and allows you to easily switch between modes by simply clicking on your desired mode.

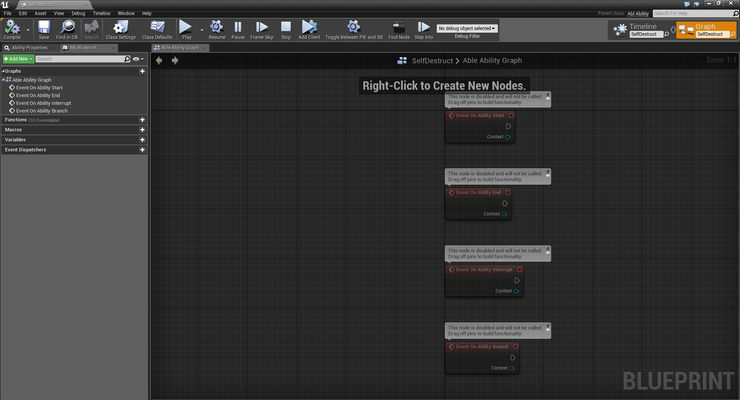
Graph Mode is the Blueprint Editor for an Ability. Abilities provide a number of hooks/events that can be overridden using Blueprint Scripting to provide any extra or special functionality.The Ability Editor itself is built on top of the Blueprint Editor in Unreal so it should look very familiar to any Blueprint Scripters out there and supports all the standard functionality (debugging, context sensitivity, etc).
For an overview on Blueprints, please see the official documentation on Blueprints.
For an overview of the various Blueprint Events that can be override in an Ability, please see Blueprint Events.
