
The Ability Animation State Node is a way for the Play Animation Task to play animation assets without stepping outside of the Animation State Machine, giving artists and animators far more control over when and how Ability animations are played. With that in mind, let's go through the process of setting that node up. Don't worry, It's pretty easy.
 Click to enlarge
Open up the Animation Blueprint of the entity you wish to set this node up on.
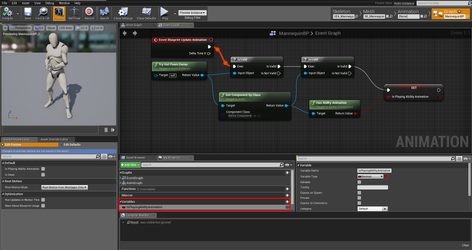
Create a variable of type Boolean and name it something descriptive. This will be our flag to the state machine that we have an Ability animation to play. For this example, the variable has been named IsPlayingAbilityAnimation and is highlighted in red.
Now that we have our variable, we need to make sure it gets updated each frame. To do this, we simply:
- Get our Pawn Owner.
- Check if our Pawn Owner is valid (safety first).
- Get our Ability Component
- Check if our Ability Component is valid (safety first).
- Call HasAbilityAnimation from the Ability Component and store the result in our variable.
Now we can hit the Compile button and everything should be fine. If not, check your blueprint against the one in the screenshot and see if you accidentally forgot a connection.
Click to enlarge
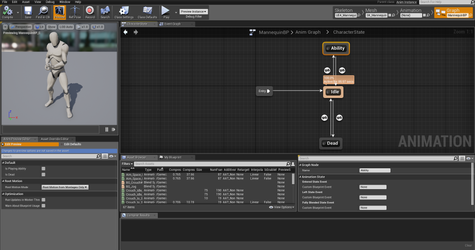
Now switch over to the AnimGraph tab and you can see this entity already has a state machine, called CharacterState, that is feeding it's output as our final pose. If you've never set up an animation state machine before, It's highly recommend you check out the official documentation that walks you through setting up a simple movement state machine.
We're not actually changing anything here, so now we'll just double click on our state machine so we can edit it.
Click to enlarge
For this example, our State Machine is very simple. It contains three states: Idle, Ability (where we'll play our Ability Animations), and Dead. For this example we only care about Idle and Ability. Once you learn the basics, you are free to arrange your state machine however you like - the structure used here isn't necessary or final, it's all up to what your character needs.
So, simple create a new state, named it whatever you want (again, for this example ours is named Ability). The editor may automatically take you into that State to start editing it, but we're not quite ready yet so back out and you'll want to add 2 transition rules. One for entering our new state, and one for exiting it. You can do this by simply dragging from one state to the other in the direction you want the transition to occur.
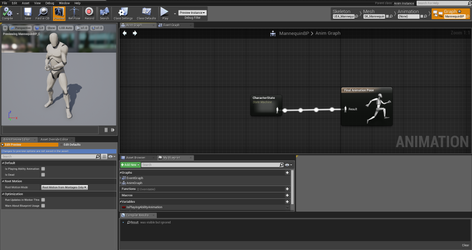
Now, double click on your new state and let's set it up!
Click to enlarge
Now, we need to add our new node. So right-click and select Play Ability Animation node. Drag a connection to the Final Animation Pose node and we're done here. Easy, right?
Click to enlarge
Click to enlarge
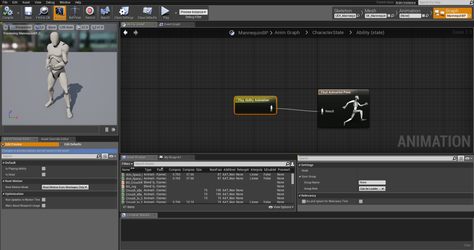
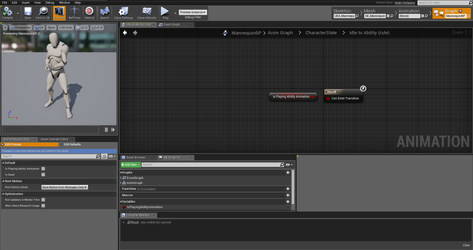
The last thing we need to do is go back and setup our transition rules. So, head back to the state machine and double click on the transition that goes to your new node (in our case it was the rule from Idle to Ability). Remember our IsPlayingAbilityAnimation variable we set up in the first step? Well, here is where we'll use it. Drag it into the graph, select Get, and hook it up to the Can Enter Transition node.
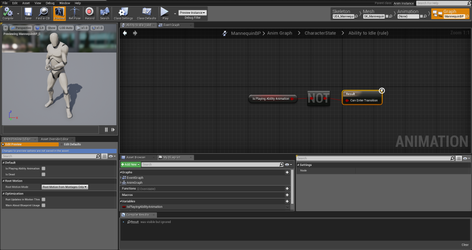
As expected, our rule to exit the new node is the opposite, so we do the same as our enter rule but toss in a NOT modifier before hooking it up to the Can Enter Transition node.
And that's it! It's all done! Load up an Ability with a Play Animation Task, make sure you set the task to use the Ability Animation Node, and give it required information - State Machine name, in this case ours was "CharacterState" (see the image in step 2), and our Ability State name was just "Ability" (see the image in step 3) - and test things out!